Introduction
This guide will walk you through entity level authentication in GraphQL and how it could be achieved with Tailcall.
What is Authentication?
Authentication is the process of verifying a user's identity before granting access to data. In most modern applications, some information, such as a list of products in an e-commerce application, is accessible to all users without requiring identification. However, personal data, like a user's order history, is accessible to the user who owns that information. Verifying a user's identity to access such personal data is known as authentication.
The primary reasons for implementing authentication in an application include:
- Protecting User-Specific Data Ensuring that data belonging to a user is not accessible by others.
- Security The ability to block users based on certain criteria necessitates identifying them.
- Customized User Experiences Delivering personalized experiences based on a user's identity.
Authentication can be implemented using credential validation mechanisms, such as:
- Basic Auth
- JWT
- OAuth
- API Key
Entity Level Authentication in GraphqQL
Entity level authentication in GraphQL refers to applying authentication logic to specific entities or types within your GraphQL schema, rather than at the API entry point or resolver level for individual queries or mutations. This approach allows you to control access to particular data types or fields based on the user's authentication status, enabling a more granular and flexible security model.
Advantages of this approach:
- Flexibility: Tailors security measures to precisely fit the needs of your application, enhancing the protection of sensitive data.
- Scalability: Facilitates extending security policies to new entities and fields as your schema expands.
- Customization: Enables implementing different authentication mechanisms for distinct entities based on their security requirements.
Tailcall Authentication
Tailcall provides a straightforward way to implement entity level authentication in your GraphQL schema. By leveraging custom directives, you can define which entities or fields require authentication to access their data. Tailcall supports multiple authentication providers, such as Basic Auth and JWT, allowing you to choose the authentication mechanism that best suits your application's requirements. to know more about how to use it, read the following articles:
Tailcall config
Enabling support for authentication in Tailcall could be done in two steps:
- With the help of
@linkdirective connect multiple authentication files as you need for different provides. To connect it use eitherHtpasswdorJwkslink type - Mark that some type of field requires authentication to be fetched with the help of
@protecteddirective
Your config could look like this now:
schema
  @server(port: 8000)
  @upstream(baseURL: "http://jsonplaceholder.typicode.com")
  @link(id: "auth-basic", type: Htpasswd, src: "htpasswd")
  @link(id: "auth-jwt", type: Jwks, src: "jwks.json") {

  query: Query
  mutation: Mutation
}

type Query {
  posts: [Post] @http(path: "/posts")
  user(id: Int!): User @http(path: "/users/{{.args.id}}")
}

type Mutation {
  user(id: Int!): User @http(path: "/users/{{.args.id}}")
}

type User @protected {
  id: Int!
  name: String!
  username: String!
  email: String!
  phone: String
  website: String
}

type Post {
  id: Int!
  userId: Int!
  title: String!
  body: String! @protected
  user: User @http(path: "/users/{{.value.userId}}")
}
In that case the whole User type and Post.body are marked as protected and therefore requiring authentication to resolve its content. That means following points:
- any query for
Post.bodywill require authentication - any query for any field of
Userwill require authentication - any field that resolves to
Usertype will require authentication
For more info about possible configuration for available providers read articles for Basic Auth and JWT
Making test requests
Now let's try to access some data from the example above. Start the tailcall server with provided config and use graphQL playground that should be opened automatically in your browser.
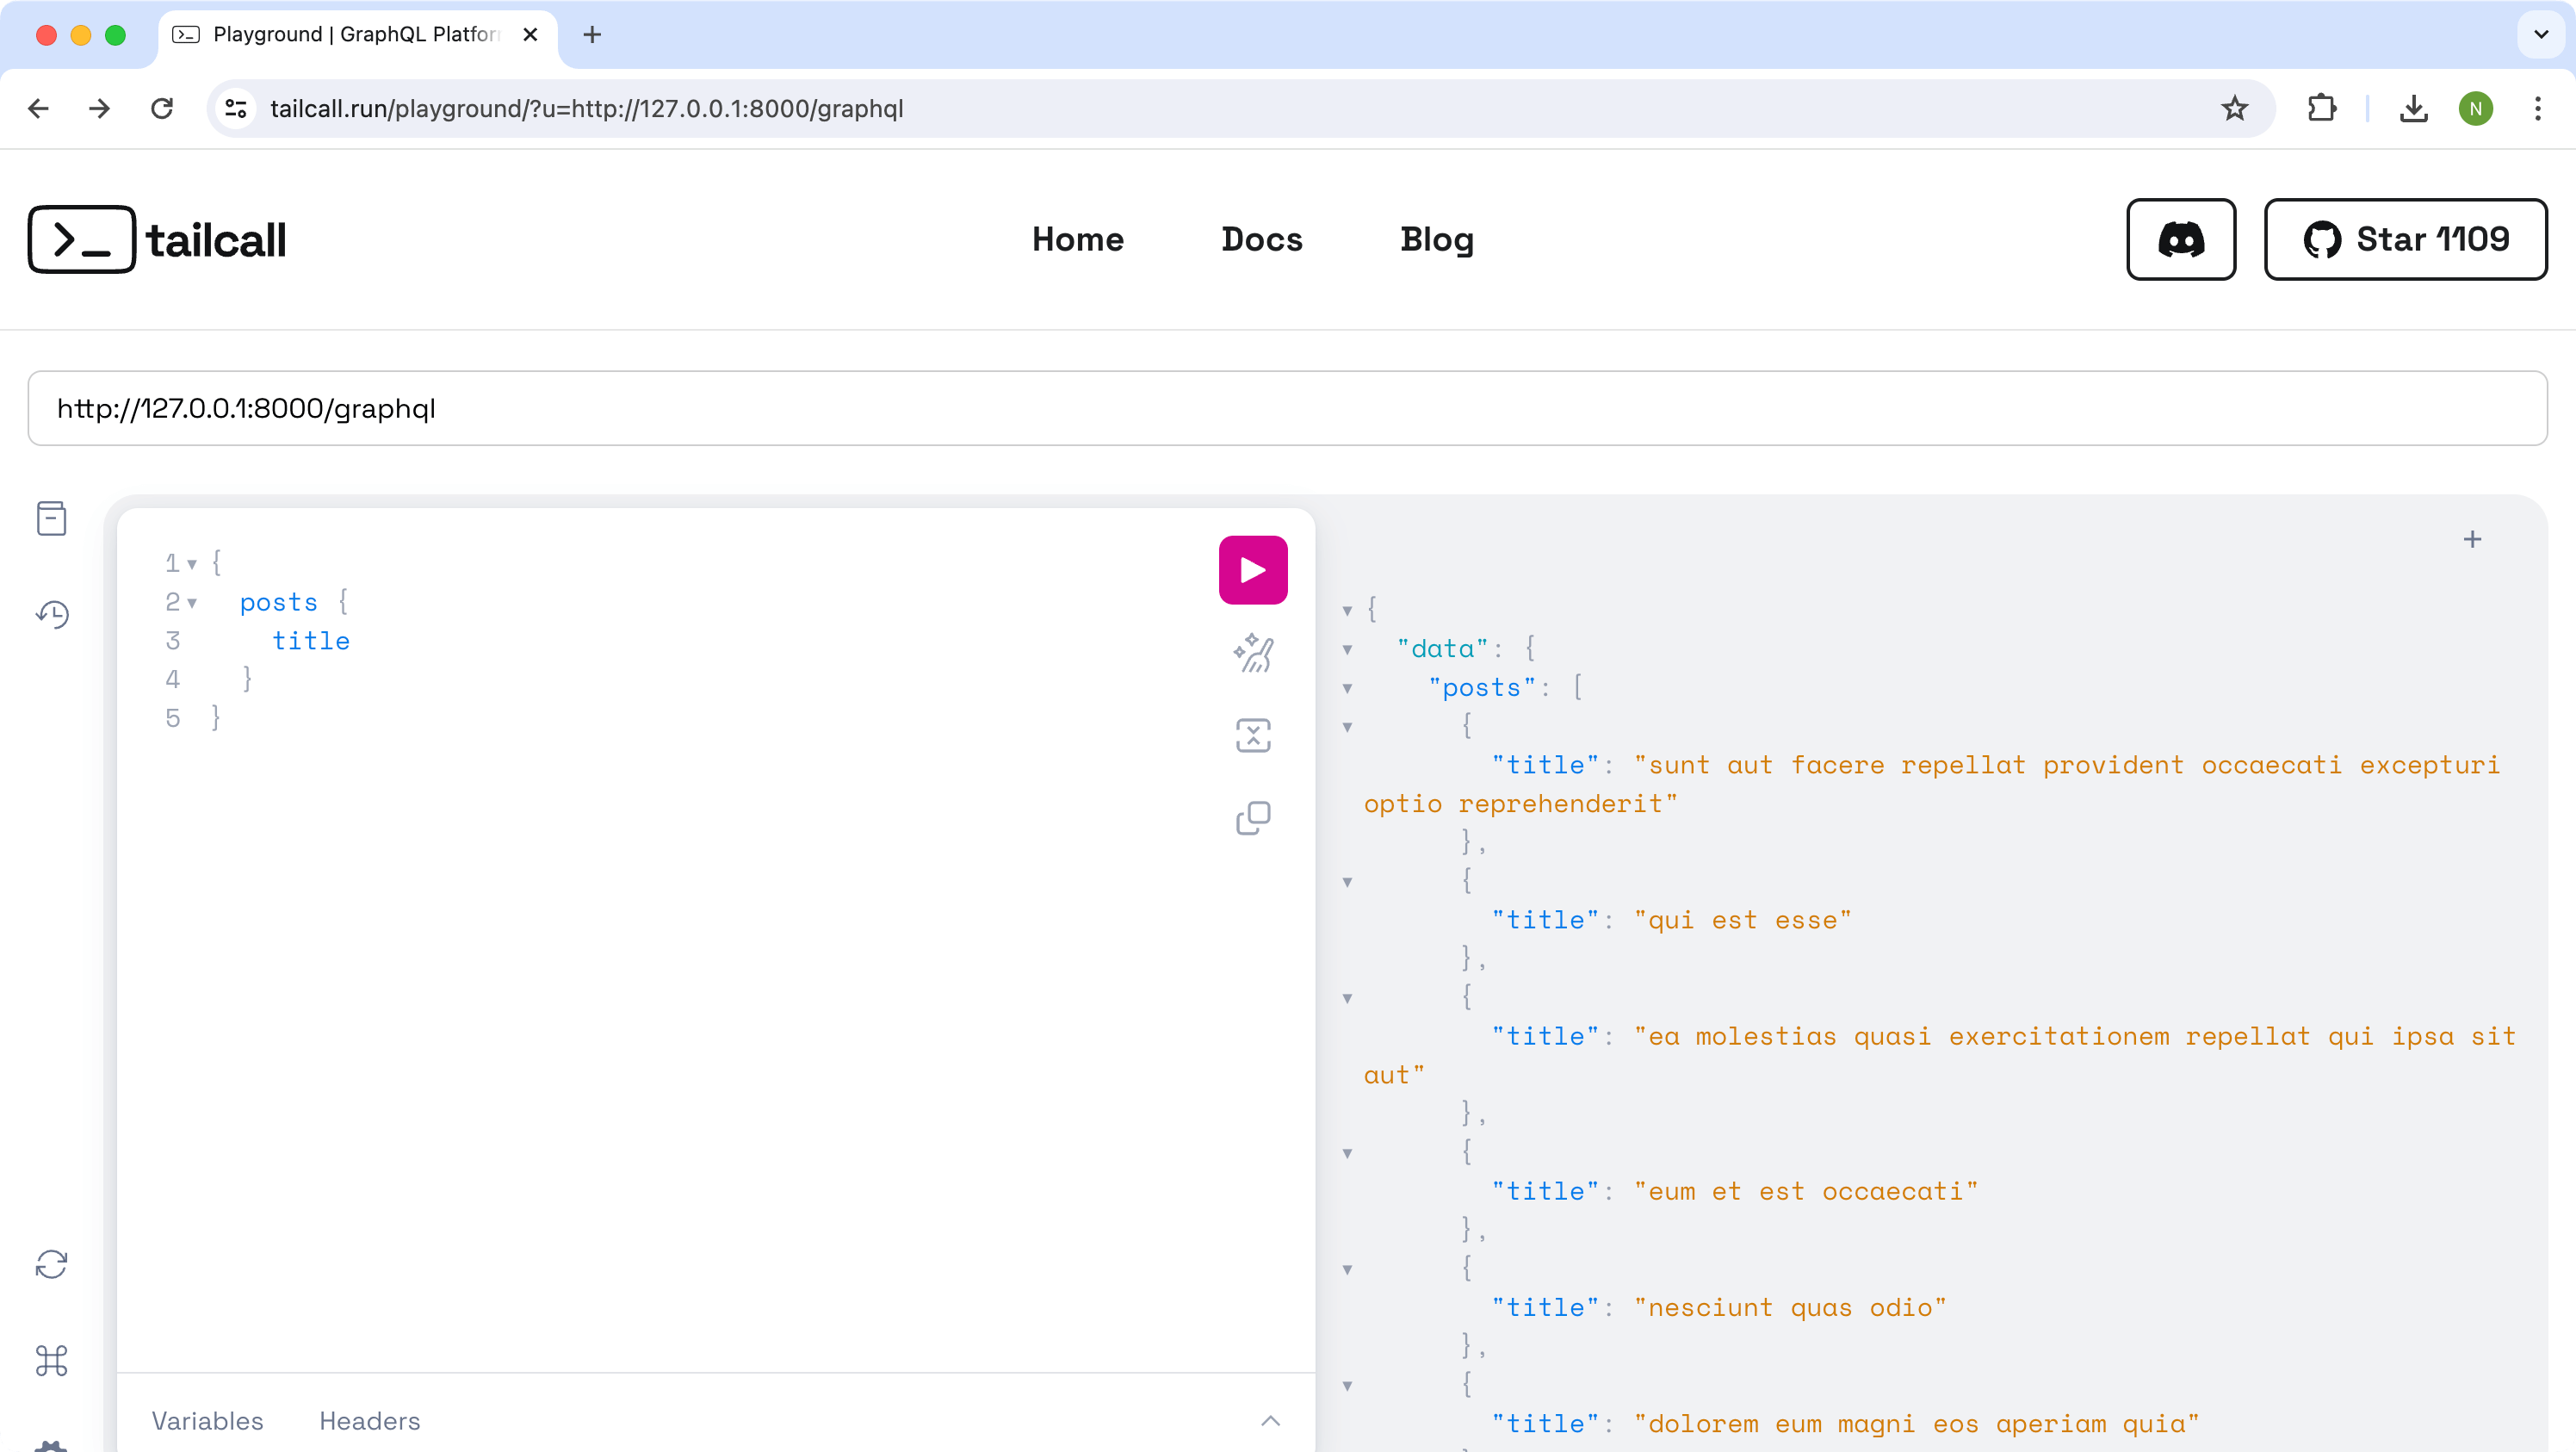
If you execute the query that don't have any @protected fields like
{
  posts {
    title
  }
}
Then the data for this will be resolved as usual without providing any additional info. showing the list of posts with their titles:
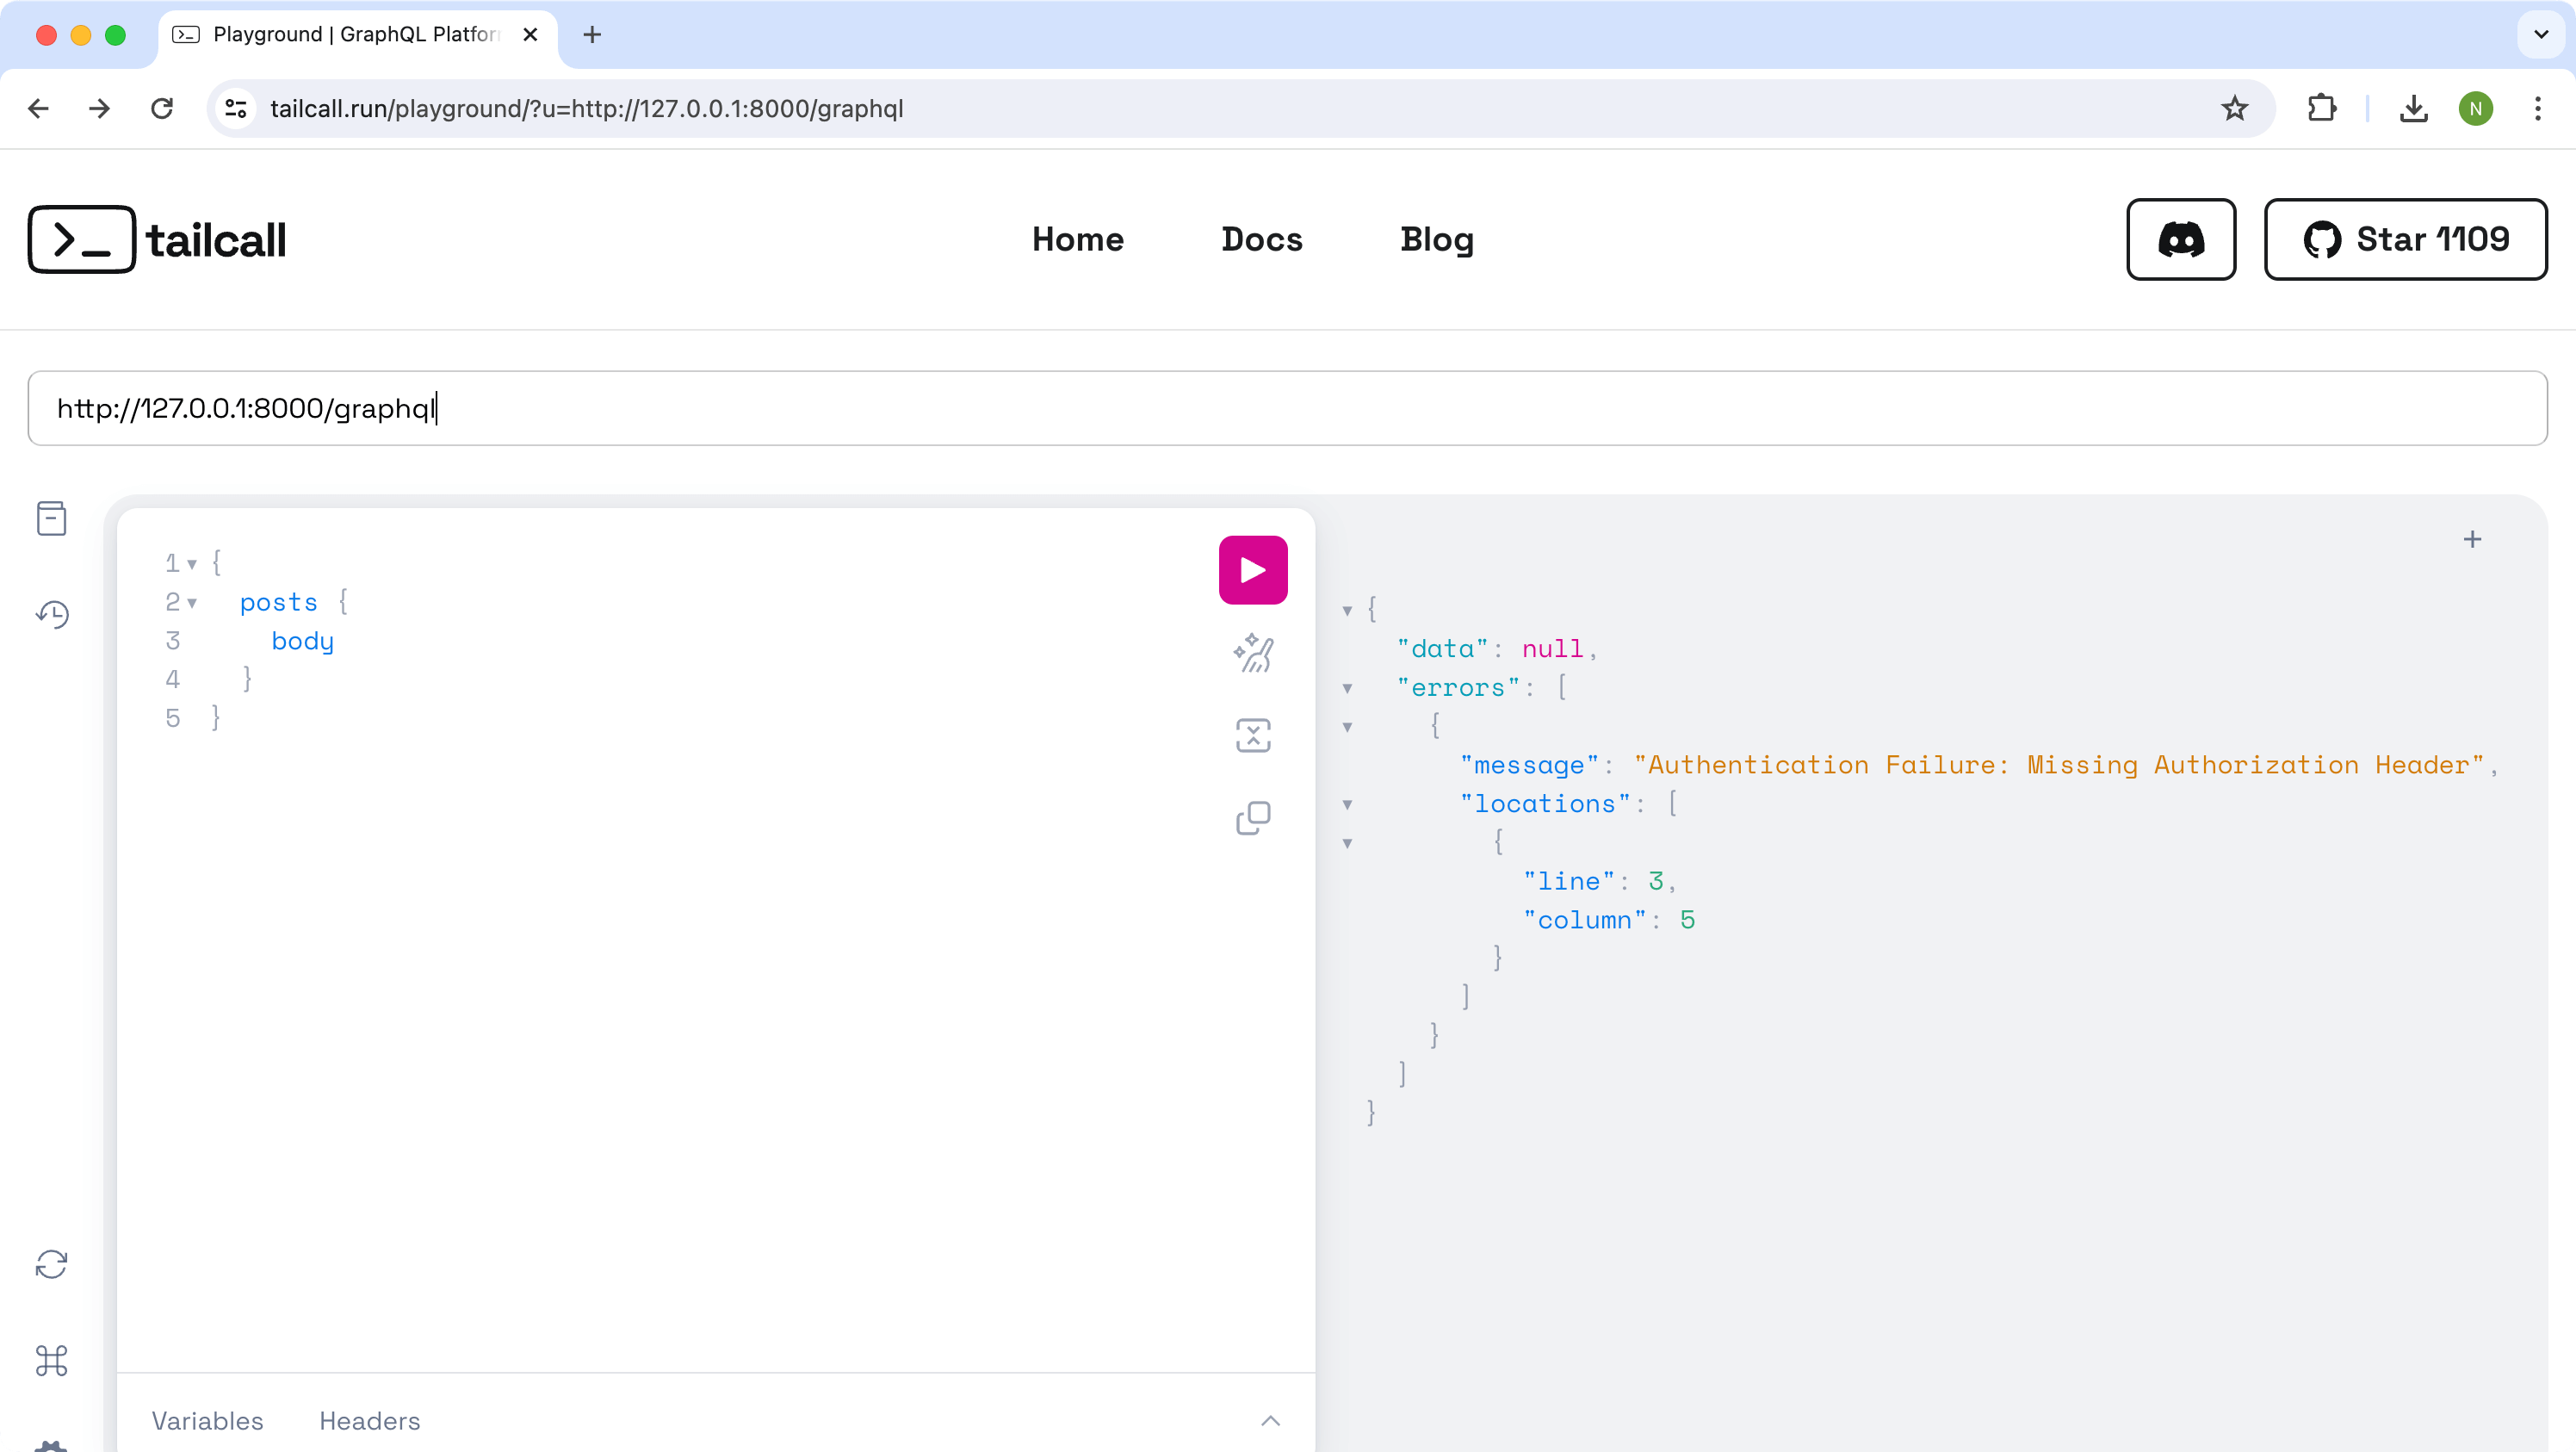
 But if you change the query to access protected data, then if you don't provide any authentication data, i.e. for query:
{
  posts {
    body
  }
}
You will get an authentication failure error stating that authentication parameters were not provided. e.g.:
{
  "data": null,
  "errors": [
    {
      "message": "Authentication Failure: Missing Authorization Header.",
      "locations": [
        {
          "line": 3,
          "column": 5
        }
      ]
    }
  ]
}
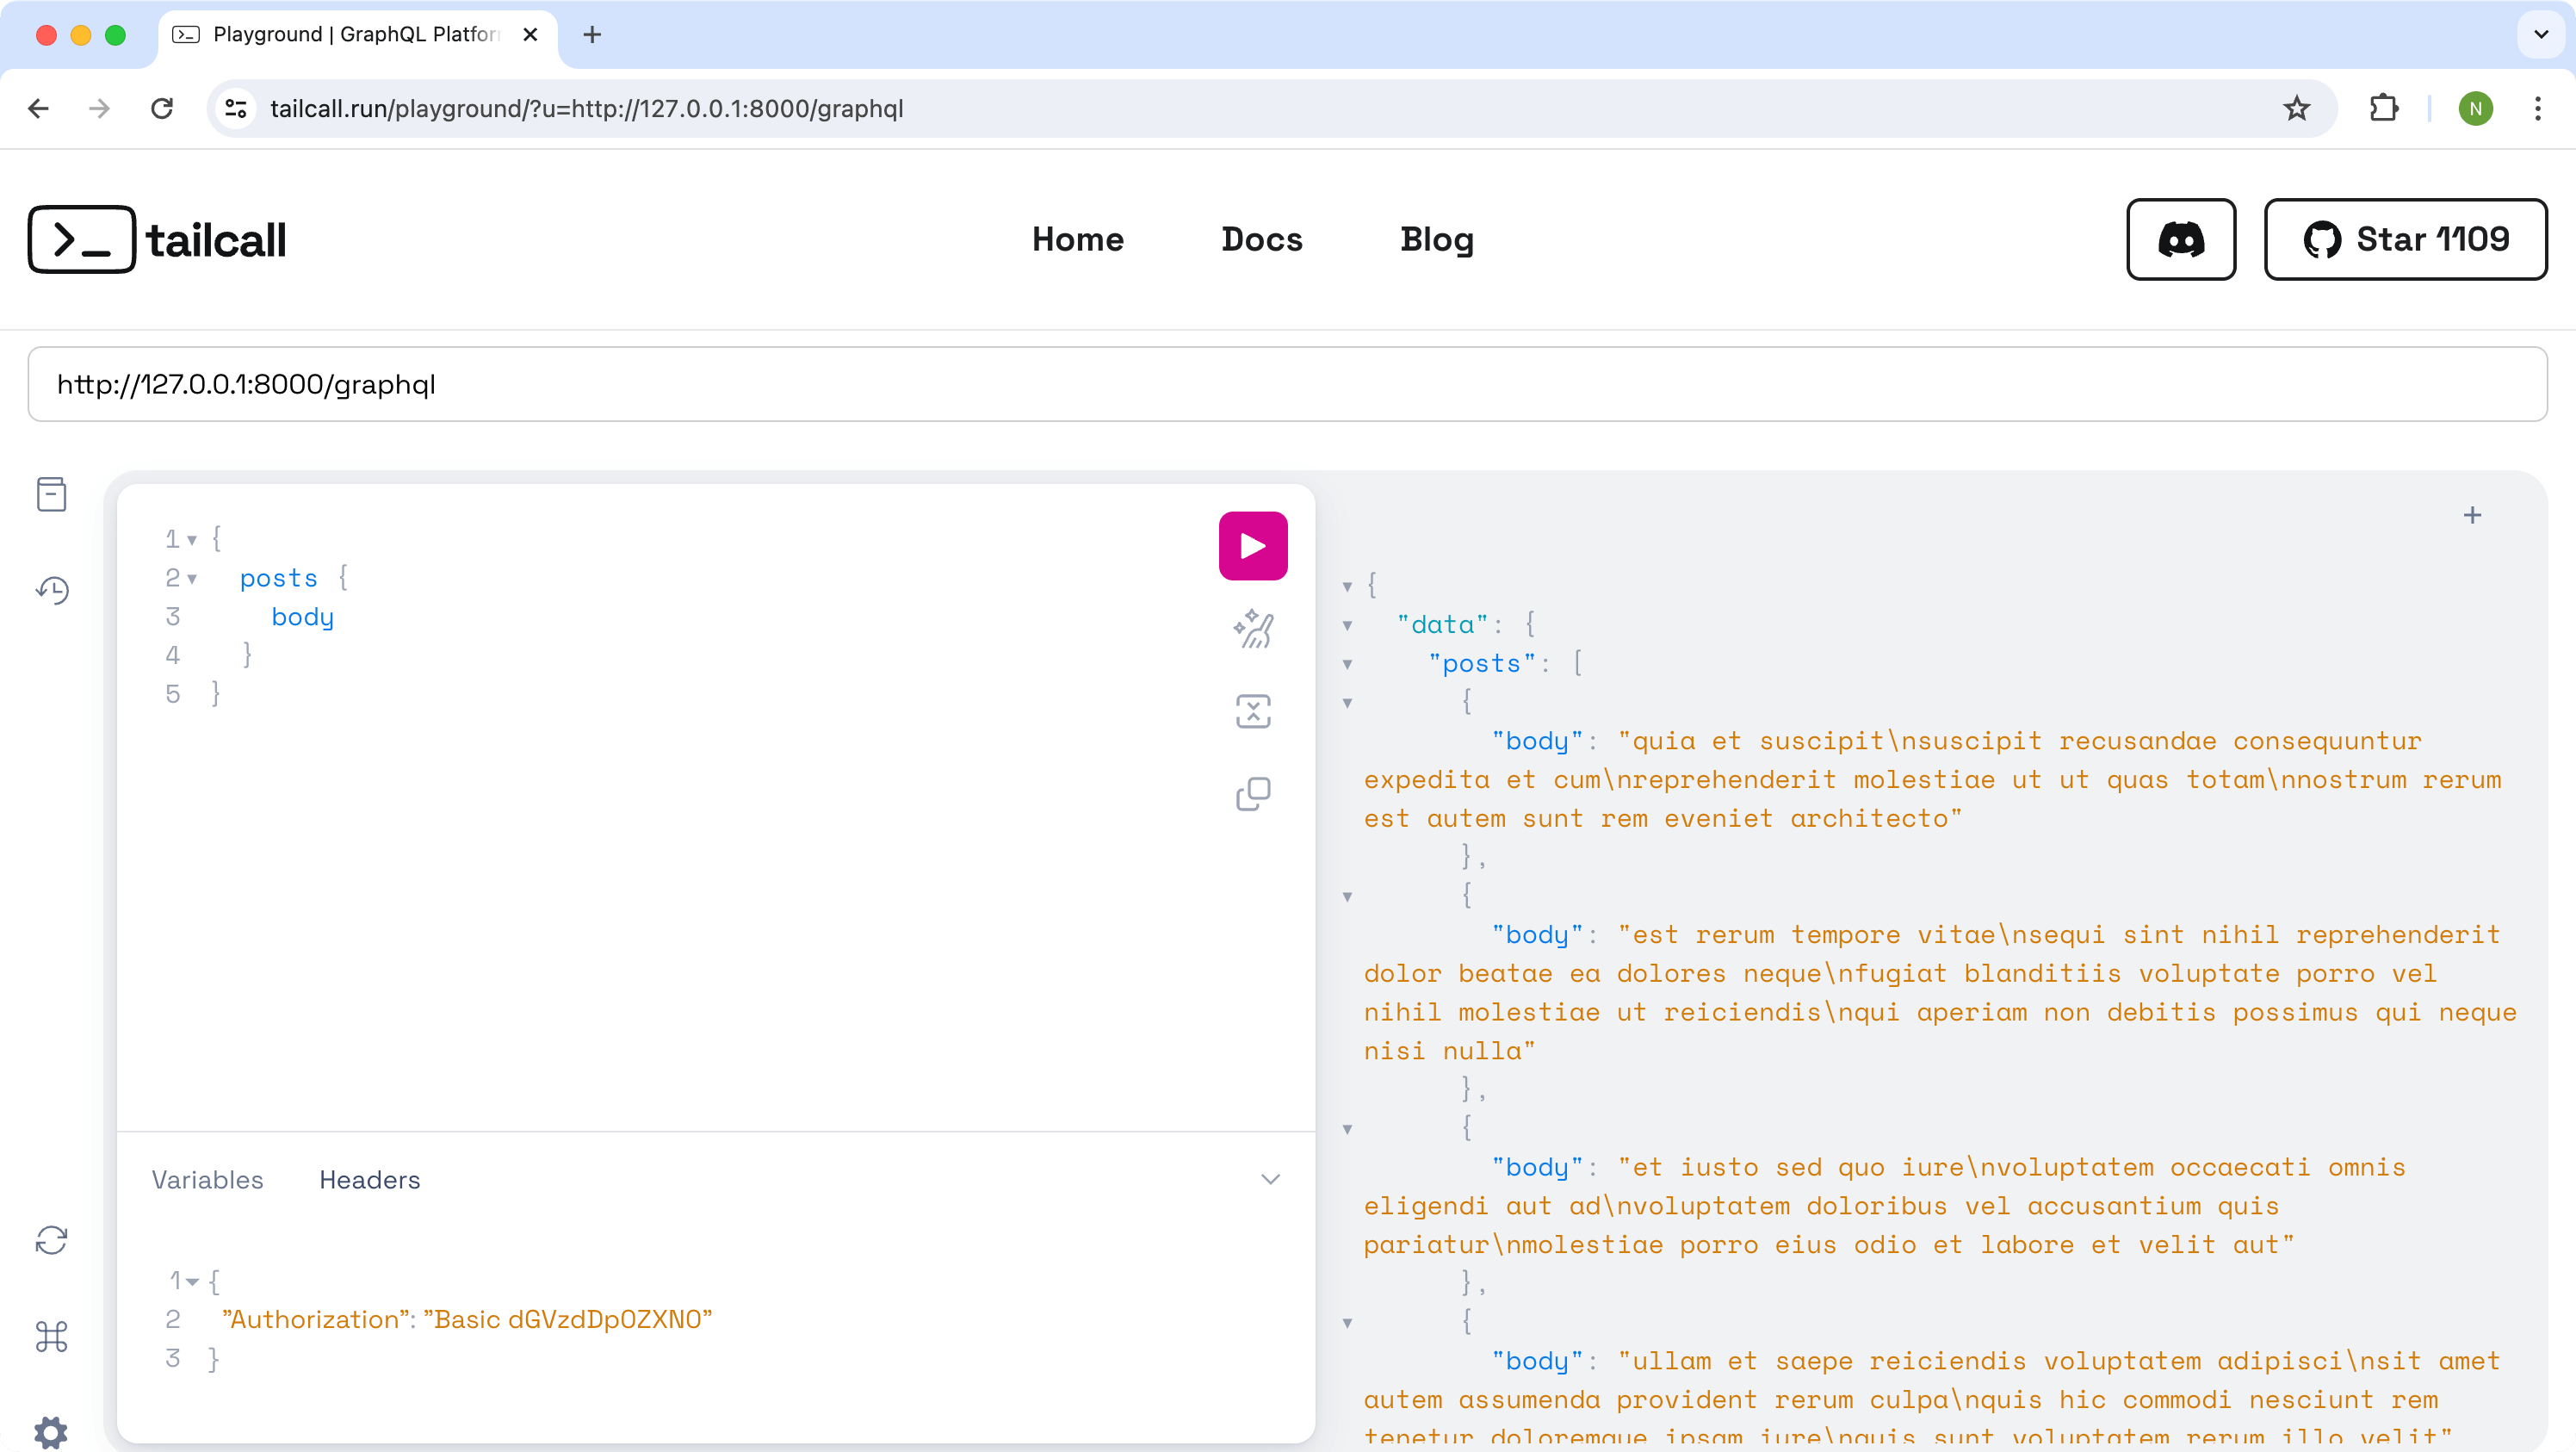
Now update the request by providing additional Authorization header. You can do in the Playground by navigating to the tab HTTP HEADERS at the bottom by adding following header for Basic Auth:
{
  "Authorization": "Basic dGVzdHVzZXIxOnBhc3N3b3JkMTIzs"
}
Now after executing the request again you'll get the response for all the requested fields without any error.
How it works
@protected Type
If type is marked with @protected then:
- attempt to request any field of that type will require authentication
- attempt to request any field from other type that resolves to protected type will require authentication and the underlying IO operation won't be executed without it
Mutation
For mutation entity level authentication works similar to queries. But since mutation involves requests that changes external state you should be careful where do you specify @protected directive because marking some nested field as protected doesn't prevent from executing the request to resolve the parent fields. I.e. following example is problematic:
schema {
  query: Query
  mutation: Mutation
}

type Query {
  user(id: Int!): User @http(path: "/users/{{.args.id}}")
}

type Mutation {
  user(id: Int!): User
    @http(path: "/users/{{.args.id}}", method: POST)
}

type User {
  id: Int!
  name: String!
  website: String @protected
}
Here you can still execute the mutation without any authentication and fail on attempting to resolve website field.
To resolve this issue, consider marking root fields as protected in case they require authentication, i.e.:
schema {
  query: Query
  mutation: Mutation
}

type Query {
  user(id: Int!): User @http(path: "/users/{{.args.id}}")
}

type Mutation {
  user(id: Int!): User
    @http(path: "/users/{{.args.id}}", method: POST)
    @protected
}

type User {
  id: Int!
  name: String!
  website: String @protected
}
Multiple auth providers
In case you linked multiple authentication files all of them will be used to execute validation process. In that case, by default, Tailcall will validate all of them in parallel and succeed if at least one of them succeed.
Authentication headers
To validate authentication for user request the specific headers are used (like Authorization header). In case auth is enabled for tailcall those headers will be also added to the allowedHeaders list and therefore they will be forwarded to the upstream requests implicitly.